All Butter Puff Pastry
Crispy, flaky layers and buttery moreish-ness… If you ever thought you couldn’t make your own puff pastry, I’m here to tell you that you can! (and should)
The recipe
This recipe makes a block of ~800g.
For the dough:
300g flour
40g icing sugar (use 20g if making the pastry for a savoury recipe)
35g unsalted butter, diced
1/2 tsp finely ground salt
1 tsp lemon juice
~180ml water, cold
For the butter block:
250g unsalted butter at room temperature (I like to leave mine out the night before)
Brief Method:
*This brief method is ideal if you’re familiar with pastry and are just looking for interest’s sake or maybe hoping to find a new recipe to try. For a more detailed method with images, scroll down!*
In the bowl of a food processor, add the flour, 35g butter, salt, sugar and lemon juice. Whizz until the mixure resembles breadcrumbs. You can also do this by hand by rubbing the butter into the flour.
With the food processor running on a medium speed, gradually trickle in the cold water until the dough starts to clump together. You may need as little as 150ml of the water or as much as 200ml. Again, you can do this by hand.
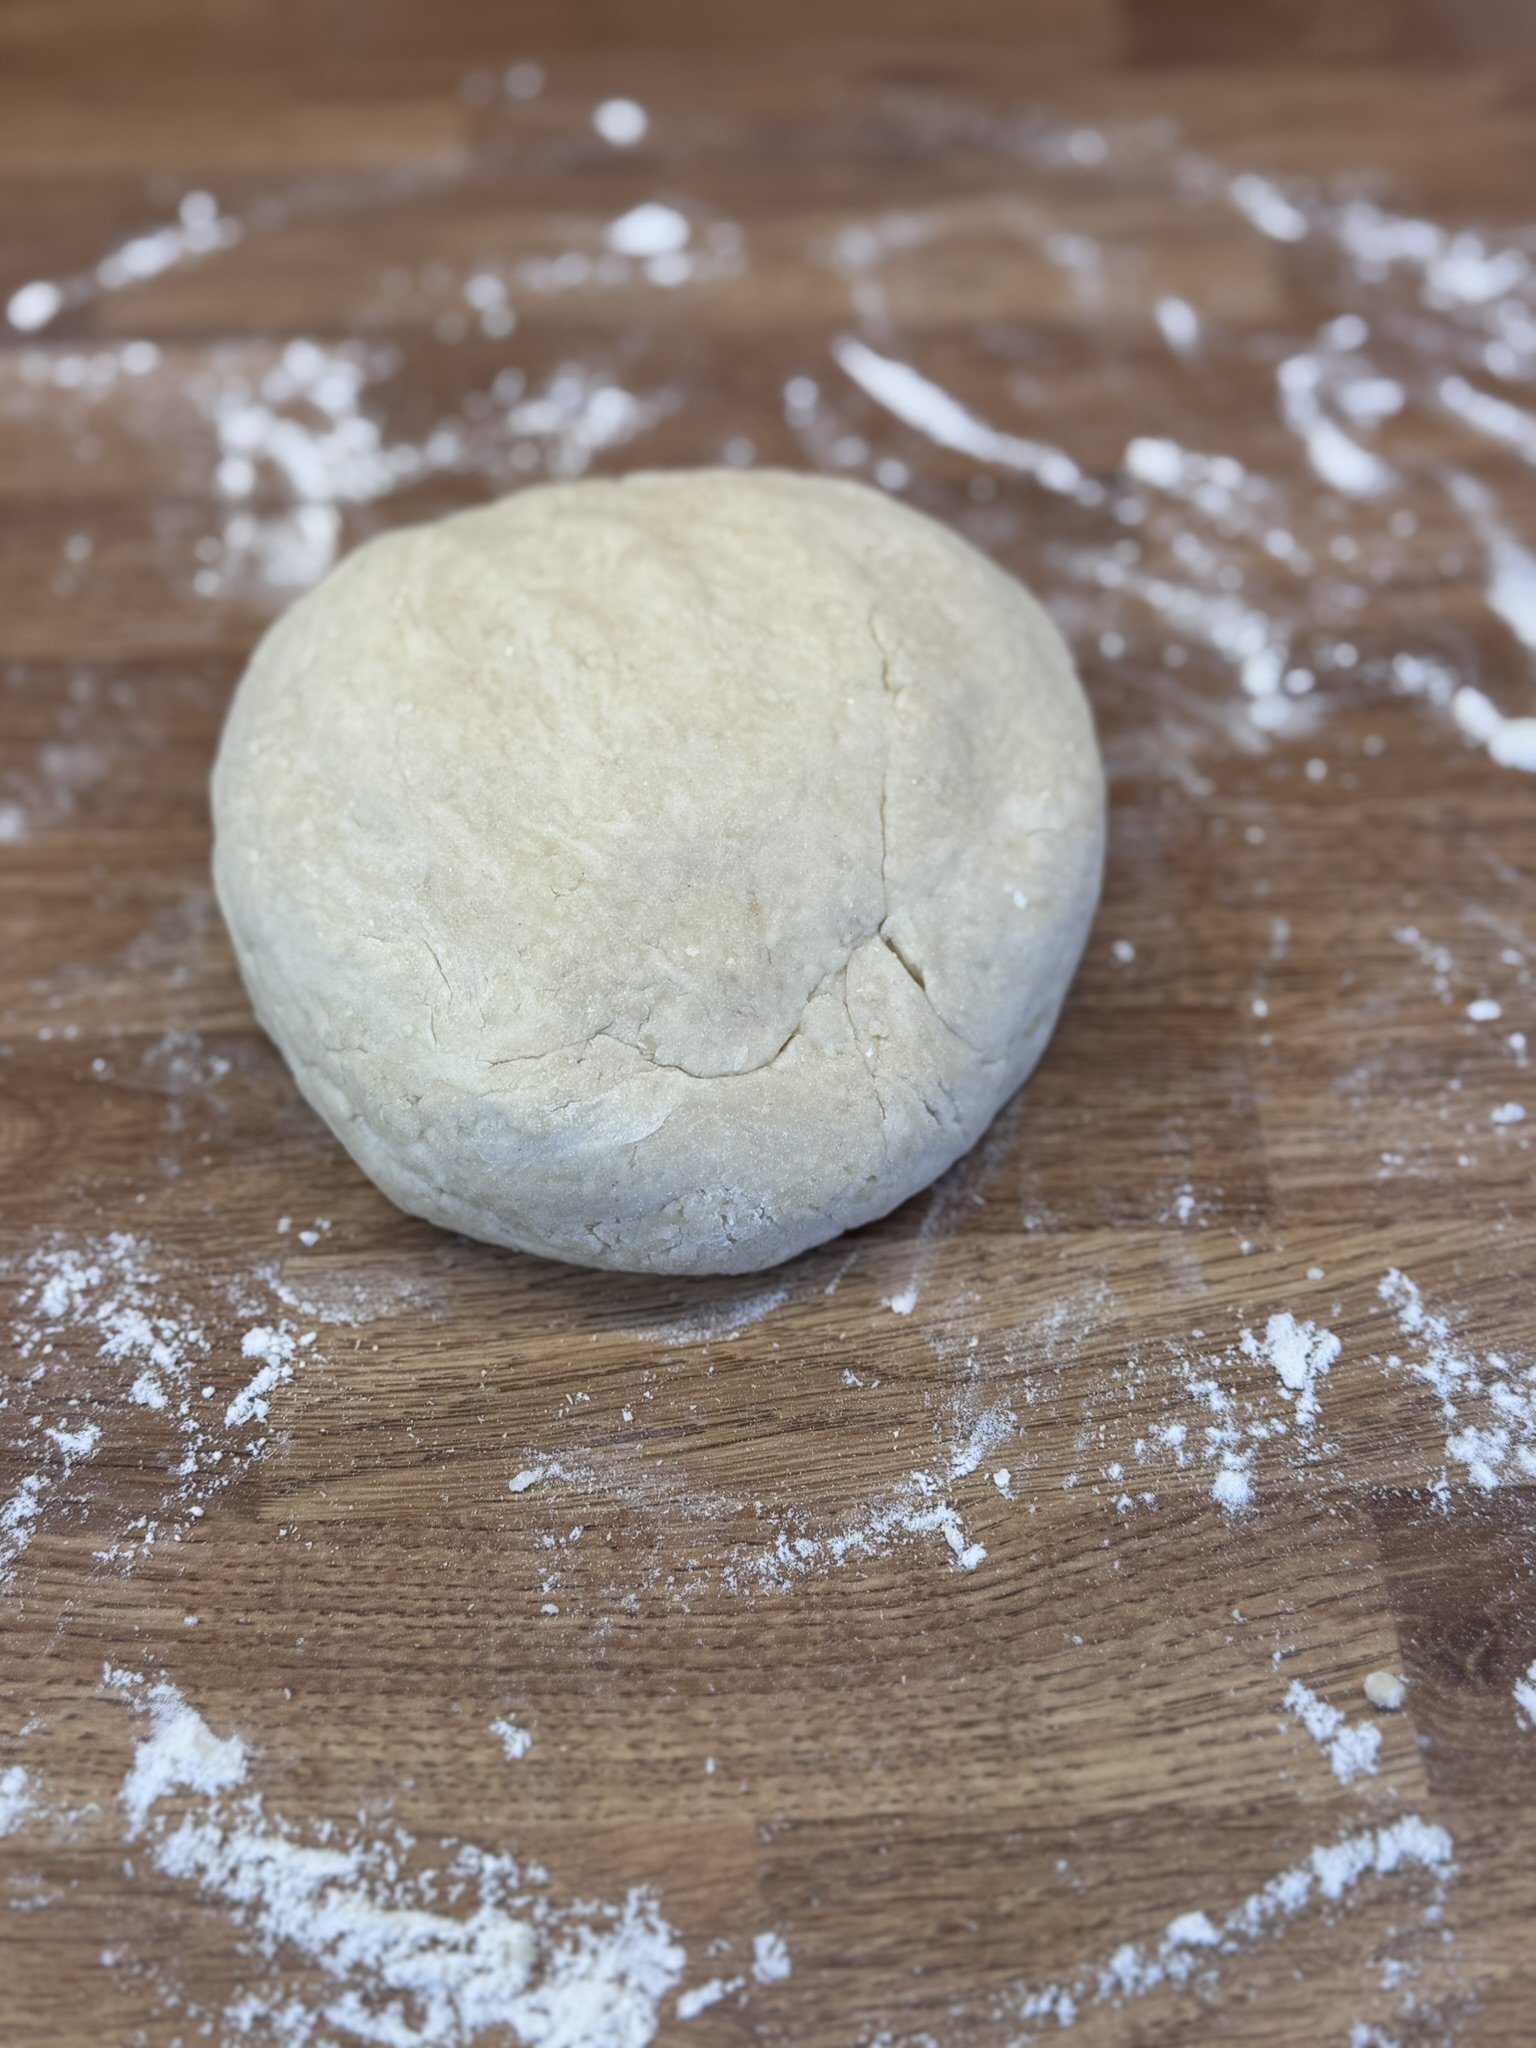
Tip the dough out onto a lightly floured clean work surface and gently press into a smooth disc. Wrap in clingfilm and place in the fridge for ~20-30mins.
Once chilled, roll the dough out to a rectangle ~7.5x12in. Place on a sheet of baking paper on a tray and pop in the freezer for 5-10mins to chill until firm.
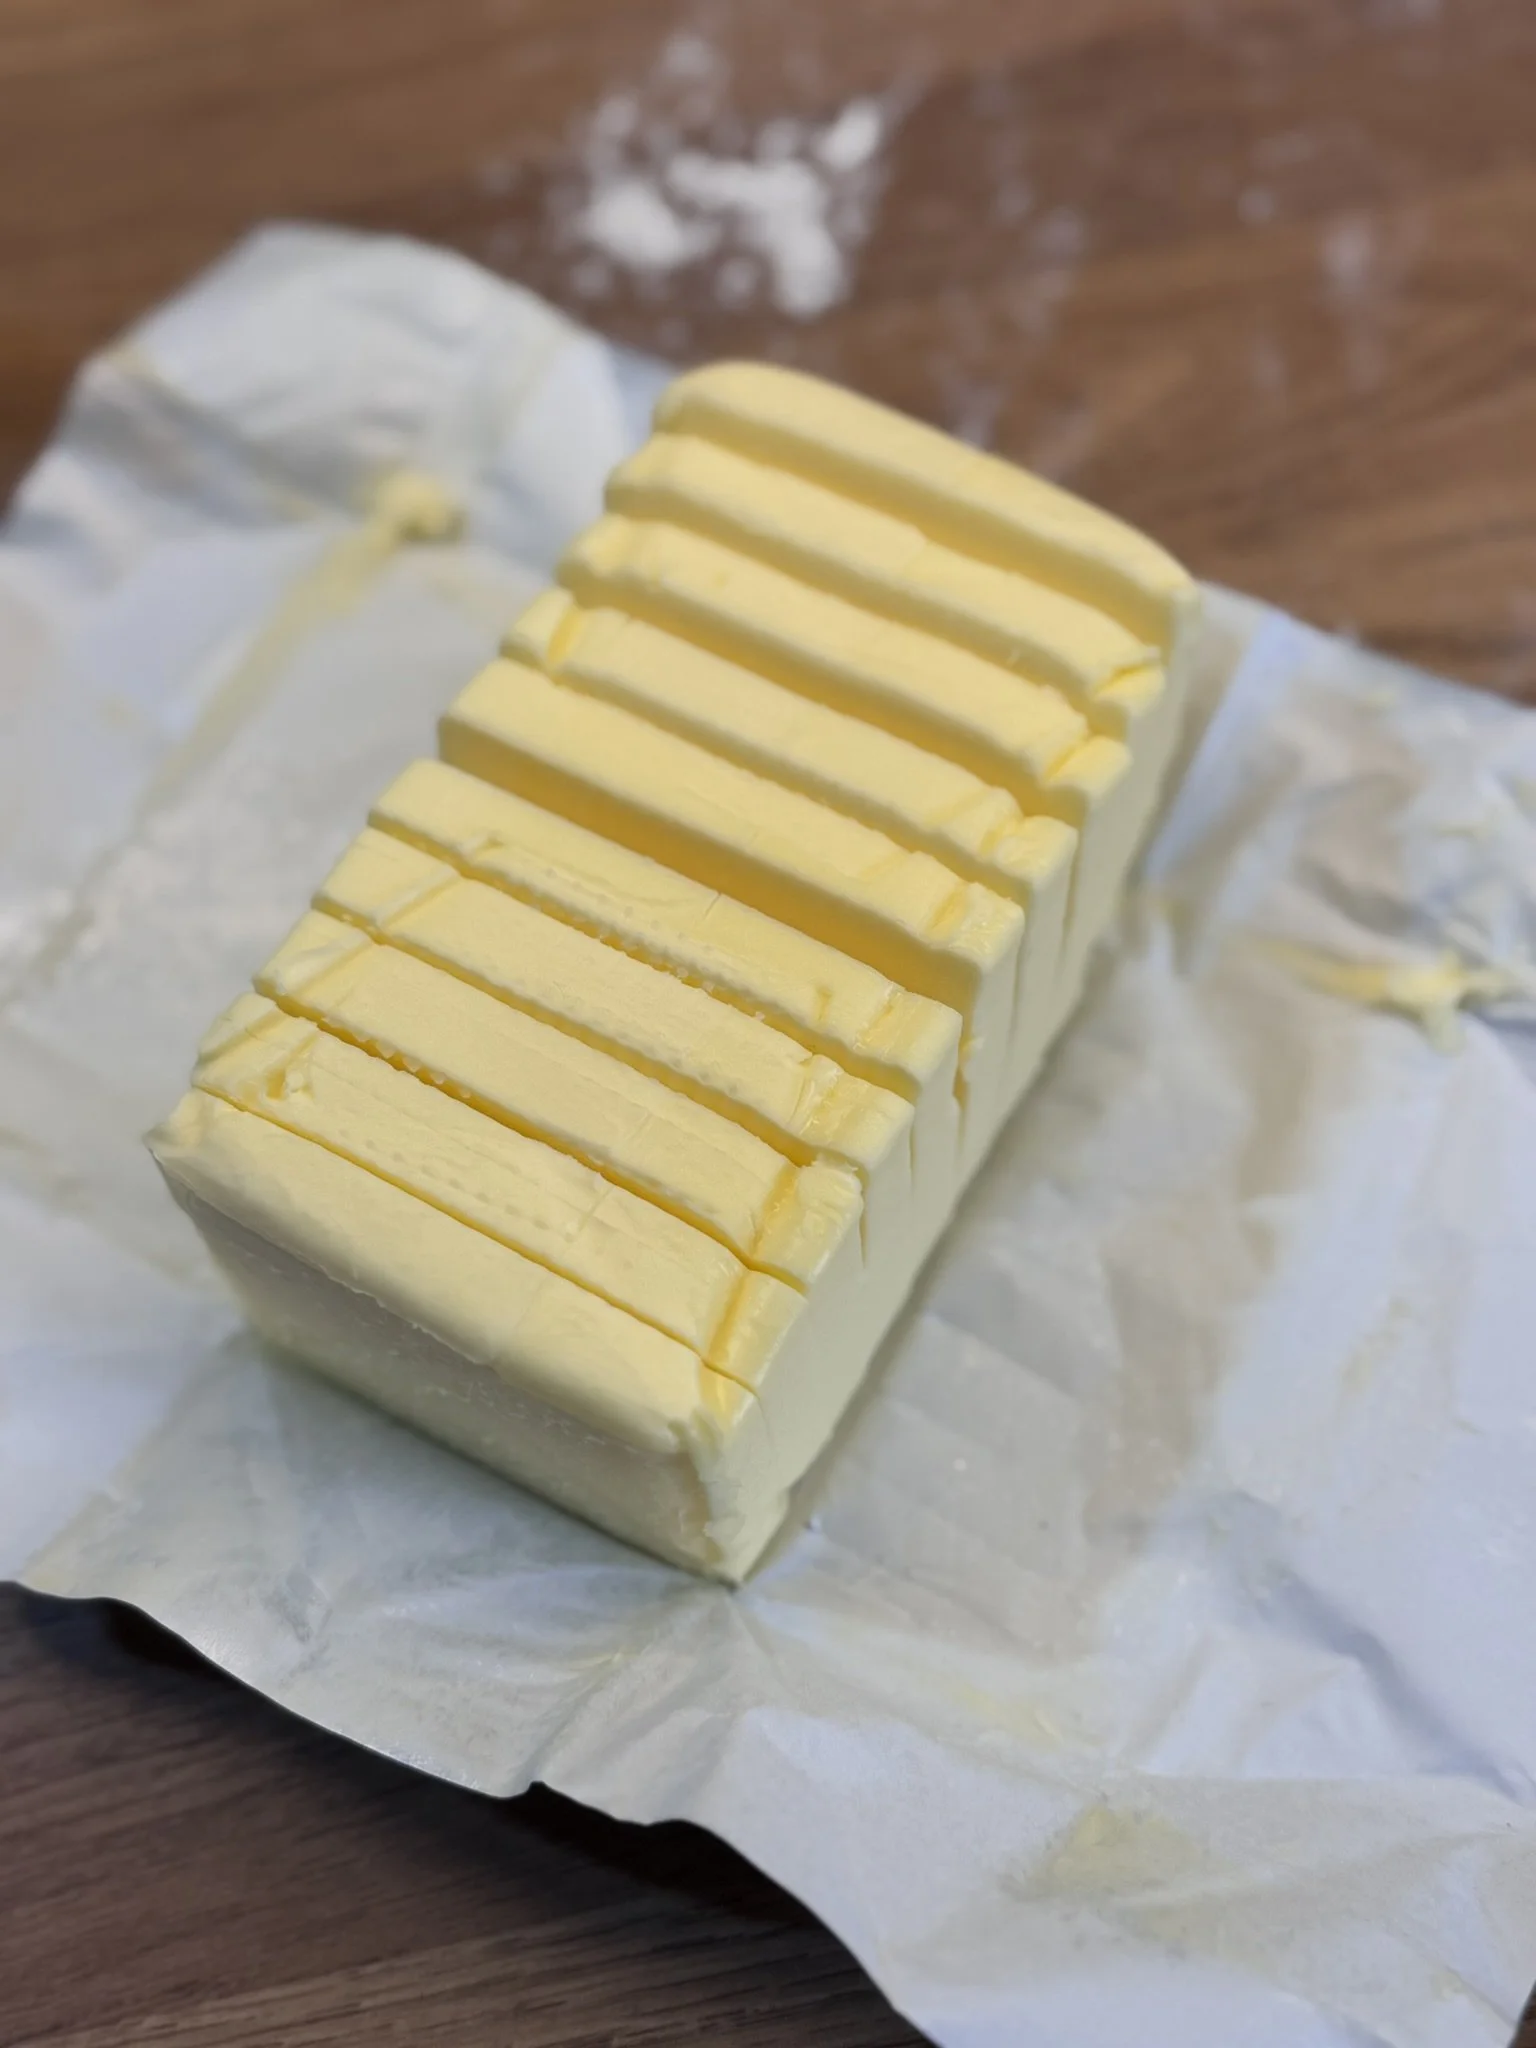
While your dough is in the freezer, slice your 250g butter for the butter block and place the pieces on a sheet of baking paper, forming a 7.5x6in rectangle. Bash and roll with a rolling pin until the butter forms a cohesive, pliable block.
Take your chilled dough out of the freezer and place the butter block in the middle of the dough rectangle. Fold the dough over to enclose the butter. Roll out to a length of ~40cm. Perform a letter fold. Rotate the pastry block by a quarter. Rest dough for 5mins (optional). Roll out again to a length of ~40cm, and perform another letter fold. Rest dough for 5mins. Roll out a third time to a length of ~40cm, and perform a third letter fold. Rest dough for 5mins, then roll out parallel to the edge with the visible folds until ~22cm long, then fold in half. Place in a ziploc bag or wrap in clingfilm and place in the fridge to rest for at least 30mins to 1 hr until using, or store in the freezer.
To use without freezing:
Divide the chilled dough into portion(s) matching the quantity needed for your recipe. Roll the dough out to a thickness of between 3-5mm depending on what the recipe calls for. Cut to the desired shape and chill in the fridge for an hour to prevent shrinking. Brush with 1 egg yolk whisked with 2TBSP cream/milk and bake at 185C for 25-30mins until risen and golden brown OR whatever the recipe calls for.
To use after freezing:
Take your frozen pastry out of the freezer the night before you want to use it, and place in the fridge overnight. The next day, use as normal from the fridge.
Detailed method:
*The following detailed version of the recipe includes some extra tips and tricks and also some photos for guidance. Ideal if you’re new to pastry!*
In the bowl of a food processor, add the flour, 35g butter, salt, sugar and lemon juice. Whizz until the mixure resembles breadcrumbs. You can also do this by hand by rubbing the butter into the flour, but I prefer to use a food processor as it’s easier, quicker and less messy.


With the food processor running on a medium speed, gradually trickle in the cold water until the dough starts to clump together. You may need as little as 150ml of the water or as much as 200ml. Again, you can do this by hand if you would like to, it’ll just take longer and be a bit messier.


Tip the dough out onto a lightly floured clean work surface and using your hands, gently press into a disc. The dough should be smooth and it should hold together well. If it falls apart or is too crumbly, you may need to add a little extra water and work it in by hand. Wrap in clingfilm and place in the fridge for ~20-30mins.


Where in shortcrust pastry, the idea is to get a short, crumbly pastry, puff pastry forms layers by expansion due to evaporation of steam created by the butter enclosed between the layers of dough. So, while most (if not all) shortcrust pastry recipes tell you not to overwork the dough, as this develops the gluten and leads to a tough pastry, puff pastry inevitably develops more gluten during the repetitive process of rolling and laminating. Because of this, it’s perfectly ok to work the dough a little by hand to ensure it forms a cohesive ball. Still, don’t knead it, if you do develop too much gluten strength too soon, the pastry will fight you the whole way through the process.
Once chilled, roll the dough out to a rectangle ~7.5x12in. You can do this by enclosing the dough in an ‘envelope’ of baking paper (see small batch croissant recipe for steps on how to do this), or you can roll the dough out to the correct length and gently use your hands to shape it to have nominally square, right edges.


Place on a sheet of baking paper on a tray and pop in the freezer for 5-10mins to chill until firm.

If your freezer is like mine, and a bit too small, you can fold the dough over with a piece of baking paper between the layers.
If, when you take the dough out of the freezer, it is not pliable, when you try unfold it, it may crack. Test the pliability by bending a small corner, if it starts cracking, leave it at room temperature until you can unfold it without cracking.
Cut a ~30in length of baking paper and fold it in half with the fold on the short side. Draw out a 6x7.5in rectangle on the outside with one line along the fold. Fold the paper along the remaining 3 lines to form a rectangular pouch.
While your dough is in the freezer, slice your 250g butter for the butter block and place the pieces inside the 7.5x6in rectangle you drew earlier (see croissant recipe for steps). It’s perfectly fine for there to be gaps of <5mm between the pieces of butter and you may need to do some trimming and rearranging to jigsaw them together. Refold the paper along the fold lines and flip it over. Using your rolling pin, bash the butter block in a few different directions along the whole surface until it starts looking more like one cohesive block. Then firmly roll parallel to the short and long sides, making sure that the butter has squidged into all the edges and corners and is an even thickness. Bash and roll with a rolling pin until the butter forms a cohesive, pliable block.


Random tip! Once the butter is a nearly perfect 7.5x6in rectangle of reasonably even thickness, I like to gently roll it up almost like a Swiss roll but not as tight - and I do this first along the long side, then unroll it and do the same along the short side. The reason I do this is it allows me to check the pliability of the butter. In general I’ve found that if you can do this without the butter block cracking or oozing, it’s a good temperature and has the right pliability.


Take your chilled dough out of the freezer and peel off the baking paper, placing the dough onto a lightly floured clean work surface or - I prefer - a silicone baking mat, also with a light sprinkling of flour. Place the butter block in the middle of the dough rectangle. Fold the dough over from both edges towards the middle to enclose the butter. Firmly press the block with a rolling pin, from the centre out along the long edge to start lenthening it. Once the block is ~30cm long you can start to firmly roll along the length. Keep even pressure, and roll out to a length of ~40cm.


Note on butter: a lot of pastry recipes place a lot of emphasis on cool temperatures when making puff pastry. While it is important that things don’t get too warm, as this will make your butter melt and seep into your dough, giving you more of a tough shortcrust rather than beautiful buttery flaky layers, similar to when making croissants, there is also the danger of having your butter too cold. If this happens, your dough will be pliable but your butter won’t be and this leads to your butter ‘breaking’ inside the dough. Once this has happened, there’s very little you can do to fix it so best to avoid it! The real goal of both puff pastry and croissant making (in my opinion only, of course) is to make sure that your butter and dough are the same level of pliability at all times.
Once you have rolled the dough out, perform the first letter fold. To perform a letter fold, fold one third of the dough in towards the middle, and then the remaining third over the top. I sometimes find that brushing a very very small amount of water onto the dough before folding it over helps the layers to adhere better, preventing them from slipping against each other when you roll the folded dough. Place in a ziploc bag or wrap in clingfilm and leave to rest for 5-10mins (this resting step is optional; I usually just forge ahead.)
In this recipe, there are 3 letter folds and a wallet fold, which gives a total of 109 layers, I think…
If you are interested in the maths behind pastry, you can visit this page.


In Autumn and Winter you can leave the dough to rest on your counter top. As it gets warmer, you may want to opt for the fridge.
Rotate the pastry block by 90 degrees.

For the first fold, you will have rolled in the direction shown in the diagram ‘Roll 1’.
Rotating the dough by 90 degrees, means you roll out the dough for the second fold in the direction shown by ‘Roll 2’.
For the next fold, repeat the same steps of rolling out the dough. Start with some firm rolling pin presses along the length and the move onto a firm, even pressure continuous roll until the dough is again about ~30cm long. Make sure the edges are straight and square, you can do this by gently using the sides of your handsto straighten up the edges. Perform another letter fold as before, and cover the dough in clingfilm or place in a ziploc bag and rest the dough for 5mins.


Rotate the pastry block by 90 degrees.
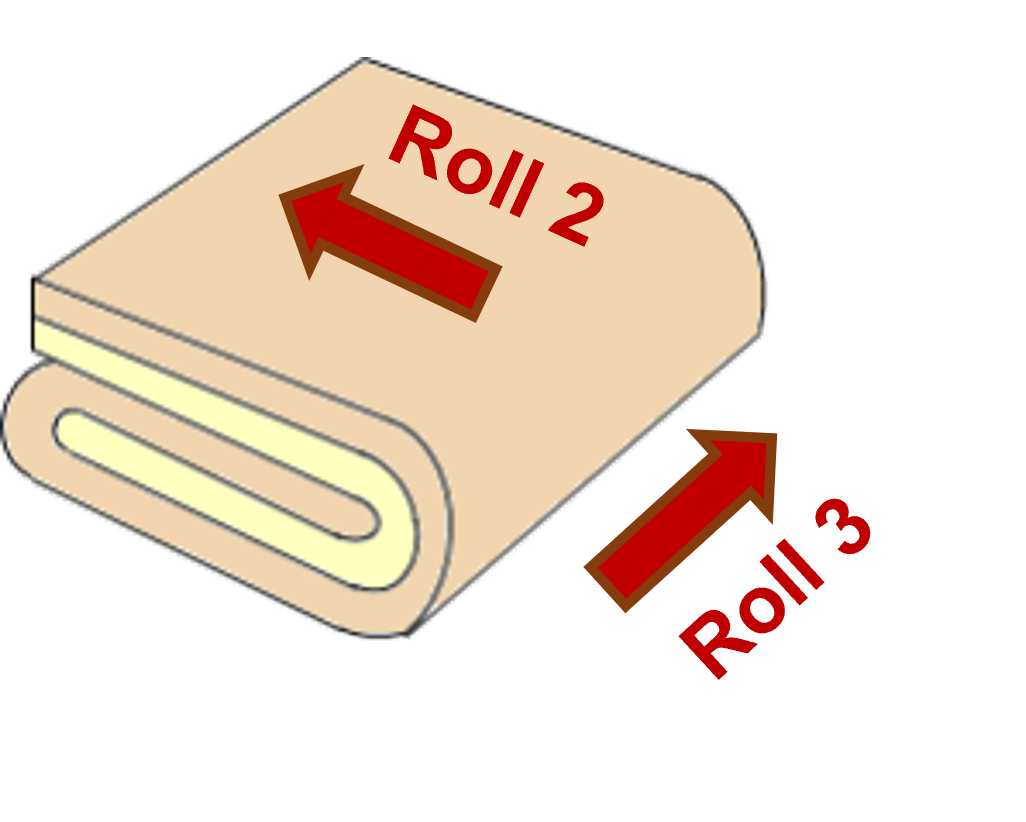
For the second fold, you will have rolled in the direction ‘Roll 2’.
Rotating the dough by 90 degrees, means you roll out the dough for the third fold in the direction shown by ‘Roll 3’.
Following the same steps as before, roll out a third time to a length of ~40cm, and perform a third letter fold.


Cover the dough in clingfilm, or place in a ziploc bag and rest the dough for 5mins, then roll out parallel to the edge with the visible folds until ~22cm long.

Roll out parallel to the edge where the folds are visible.
The dough should be ~22-25cm long just to make it easier to fold in half.
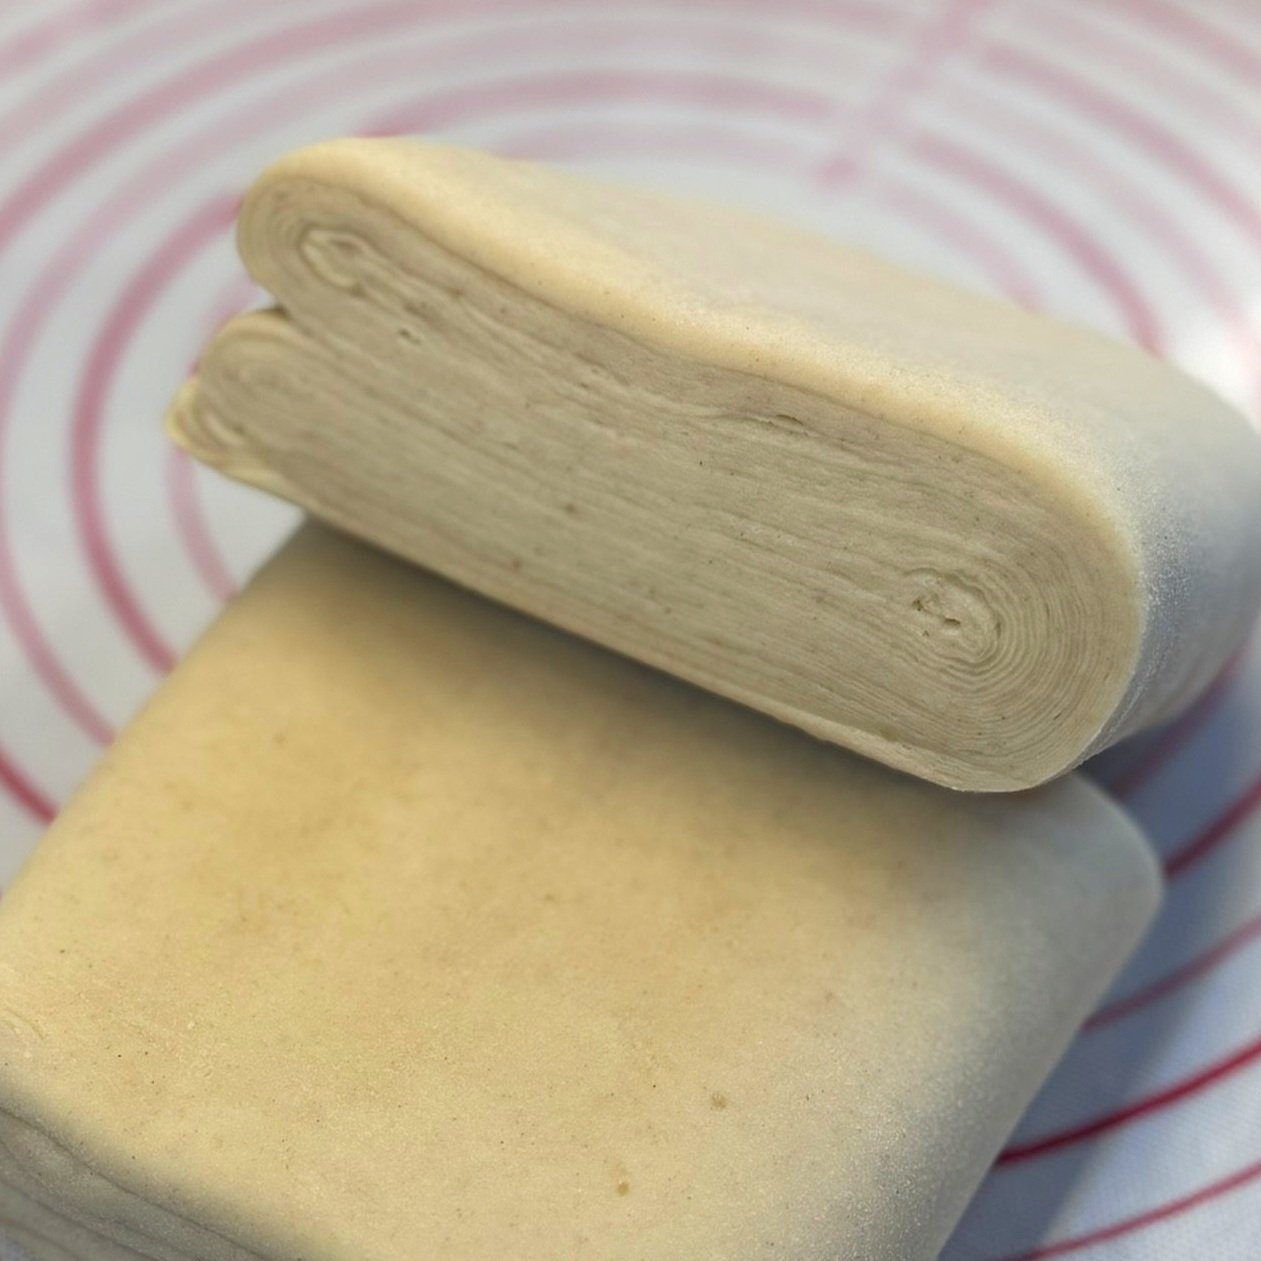
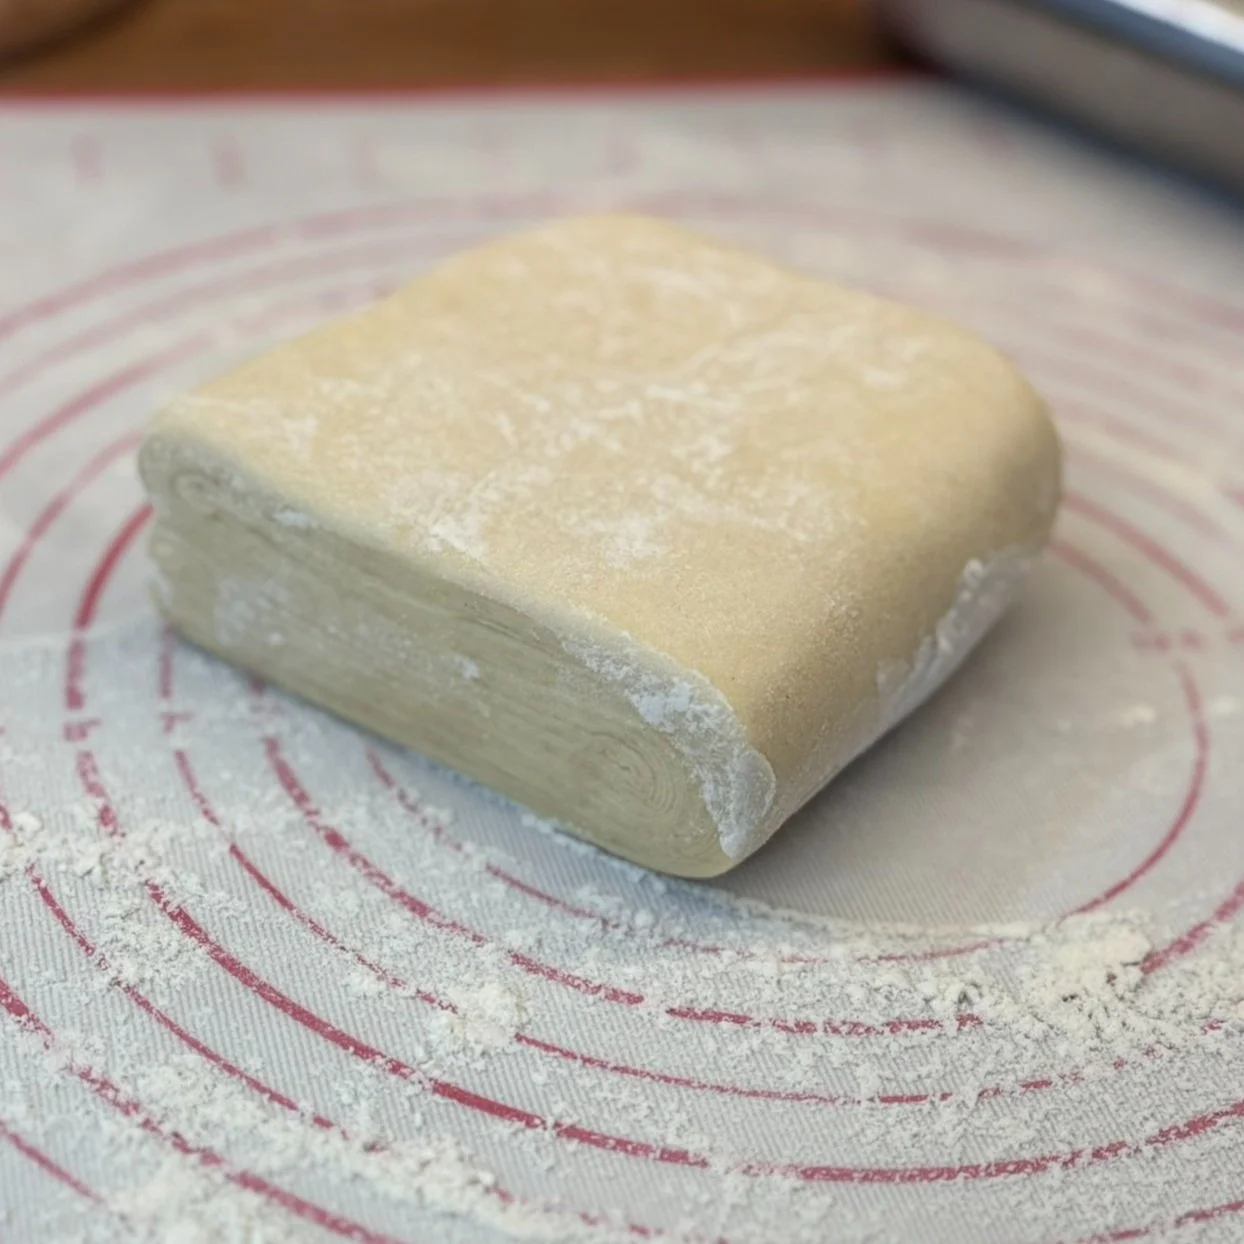
Finally, fold the dough in half to complete the last fold - the wallet fold. Divide into two 400g blocks - this also allows you a sneak peek at your layers! -and place in a ziploc bag or wrap in clingfilm. Then place in the fridge to rest for at least 30mins to 1 hr until using, or store in the freezer.


To use after freezing:
Take your frozen pastry out of the freezer the night before you want to use it, and place in the fridge overnight. The next day, use as normal from the fridge.
To use without freezing:
Divide the chilled dough into portion(s) matching the quantity needed for your recipe. Roll the dough out to a thickness of between 3-5mm depending on what the recipe calls for.


Cut your rolled out dough to the desired shape (in these photos I was making little fruit tarts!) and chill in the fridge for about an hour to prevent shrinking in the oven. Brush with an egg yolk whisked with 2TBSP cream/milk, and bake at 185C (170C fan) for 25-30mins until risen and golden brown OR whatever the recipe calls for.


Here are a few things you can make with your freshly-made gorgeous buttery puff pastry!


