Small batch croissants
I decided to try learn how to make croissants during my PhD when I’d come home after a stressful day in the lab and need to keep my hands busy so my mind would be quiet! I started out with a great recipe from @theflavourbender (IG) and over the last few years, I’ve developed my own recipe.

The recipe
This recipe makes 8 good size croissants.
Note: You can easily make this recipe vegan by replacing the dairy milk with coconut/nut/oat milk and the dairy butter with any unsalted vegan butter block. I’ve tried Naturli and Flora and both work well! Note that vegan butter tends to melt at lower temperatures than dairy butter so keep this in mind when working with the dough.
For the dough:
128g whole milk
90g water
5g barley malt syrup/honey/maple syrup
8.5g dry instant yeast
~30g sourdough discard (somewhat optional)
38g unsalted butter, melted
200g plain flour (and extra for dusting)
175g strong white bread flour
35g caster sugar
5g fine salt
For the butter block:
220g unsalted butter at room temperature (I like to leave mine out the night before)
Brief Method:
*This brief method is ideal if you’re familiar with pastry and are just looking for interest’s sake or maybe hoping to find a new recipe to try. For a more detailed method with images, scroll down!*
In a medium mixing bowl, add the flours, salt and sugar. Gently whisk with a balloon whisk to make sure the salt isn’t clumped in one spot. Set aside.
Weigh out the milk in a heatproof measuring jug and warm slightly. Stir in the barley malt syrup until dissolved, then add the water. Check the temperature of this mixture - it should be between 25-30C. Stir in the sourdough discard and the yeast, don’t worry too much about lumps, you’ll deal with them later!
Pour the melted butter into the flour mixture and then pour in the wet ingredients. Using a silicone spatula, gently mix until it forms a rough dough. Then tip the dough out onto a smooth, clean work surface. Knead by hand until the dough becomes smooth and elastic. Gently shape the dough into a ball and place back into the mixing bowl. Cover and leave in a warm place to rise until nearly doubled in size.
Fold a sheet of baking paper over to enclose your risen dough and roll out to a 9x12in rectangle. Place on a tray in the freezer for 20mins.
Slice your butter for the tourage (butter block) and place the pieces on a sheet of baking paper, forming a 6x9in rectangle. Bash and roll with a rolling pin until the butter forms a cohesive, pliable block.
Take your chilled dough out of the freezer and place the butter block in the middle of the dough rectangle. Fold the dough over to enclose the butter. Roll out to a length of ~22in. Trim edges to be straight. Perform a book fold. Rest dough for 15mins (optional). Roll out to a length of 20-22in, trim edges to be straight, and perform a letter fold. Firmly roll out to a block approximately 7x8in. Place in a ziploc bag and rest for 15-20mins.
Roll the rested dough to a rectangle ~32x34cm and trim the edges to ensure they’re straight. Cut out eight 8x34cm triangles for eight croissants OR eight 8x17cm rectangles for eight pain au chocolat OR four ~8x34cm triangles and four ~8x17cm rectangles for a half-half batch of four croissants and four pain au chocolat.
Space out evenly on two lined baking trays and leave in a warm place to rise for 3-5hrs until increased in size by ~75% (nearly double).
Preheat your oven to 190C (180C fan). Whisk together one large egg yolk and 2 TBSP milk and brush risen pastries evenly with this mixture. Bake for 24-26mins until golden brown.
Detailed method:
*The following detailed version of the recipe includes some extra tips and tricks and also some photos for guidance. Ideal if you’re new to pastry!*
In a medium mixing bowl, add the flours, salt and sugar. Gently whisk with a balloon whisk to make sure the salt isn’t clumped in one spot. Set aside.

It’s important to whisk the flours, sugar and salt together. If the salt is in one spot, you run the risk of it negatively affecting the yeast.
Weigh out the milk in a heatproof measuring jug and warm slightly (I do 30s in an 800W microwave). Stir in the barley malt syrup until dissolved, then add the water. Ideally using a thermometer, but you can do this by feel, check the temperature of this mixture - it should be between 25-30C. Stir in the sourdough discard and the yeast, don’t worry too much about lumps, you’ll deal with them later!


Pour the melted butter into the flour mixture and then pour in the wet ingredients. I like to use a silicone spatula to make sure I get all the dregs out of the measuring jug. Using the same spatula, gently mix until it forms a rough dough.


Tip the dough out onto a smooth, clean work surface. You can lightly flour the surface but you shouldn’t have to. Knead by hand until the dough becomes smooth and elastic. Usually this takes me 3-4mins.
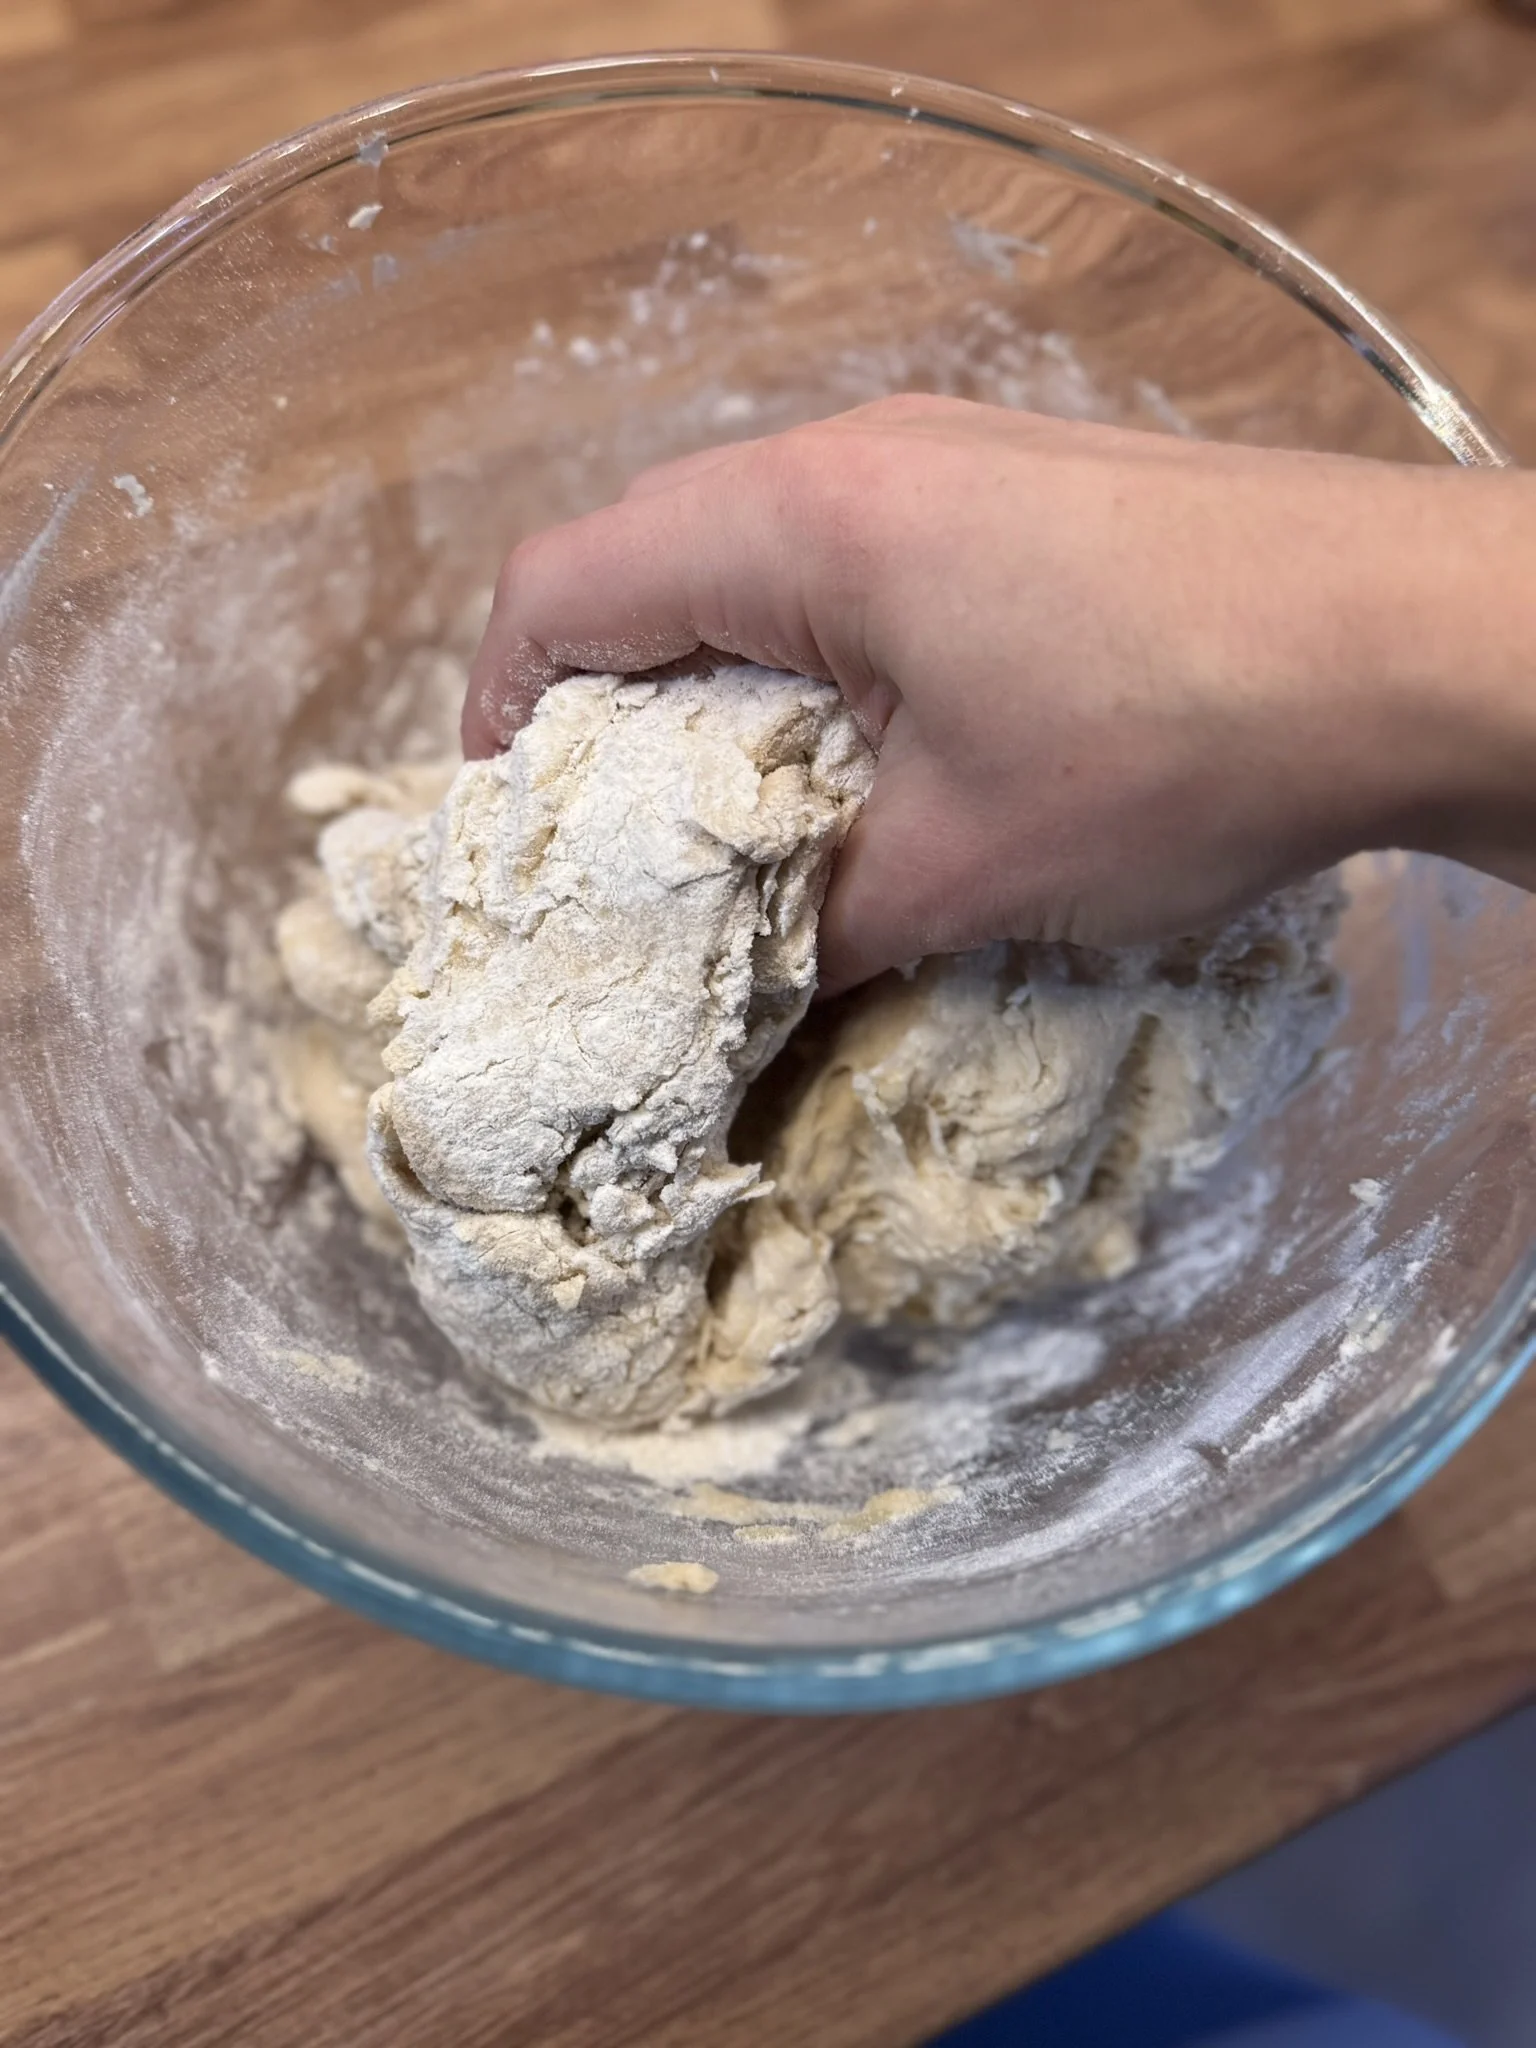


Gently shape the dough into a ball and place back into the mixing bowl. Cover with a plastic showercap/linen bowl cover/clingwrap/damp towel and leave in a warm place to rise until nearly doubled in size.


Note on proofing: the ideal proofing temperature is between 20-25C. In Summer, the dough will rise to nearly double within ~50mins just left on the counter. In Winter, it needs a little extra help, so I like to leave the bowl in my oven with just the light on and the door very slightly ajar. The freshness of your yeast will also affect rising time. I’ve had some batches that rise within 45mins and others that need up to 80mins.
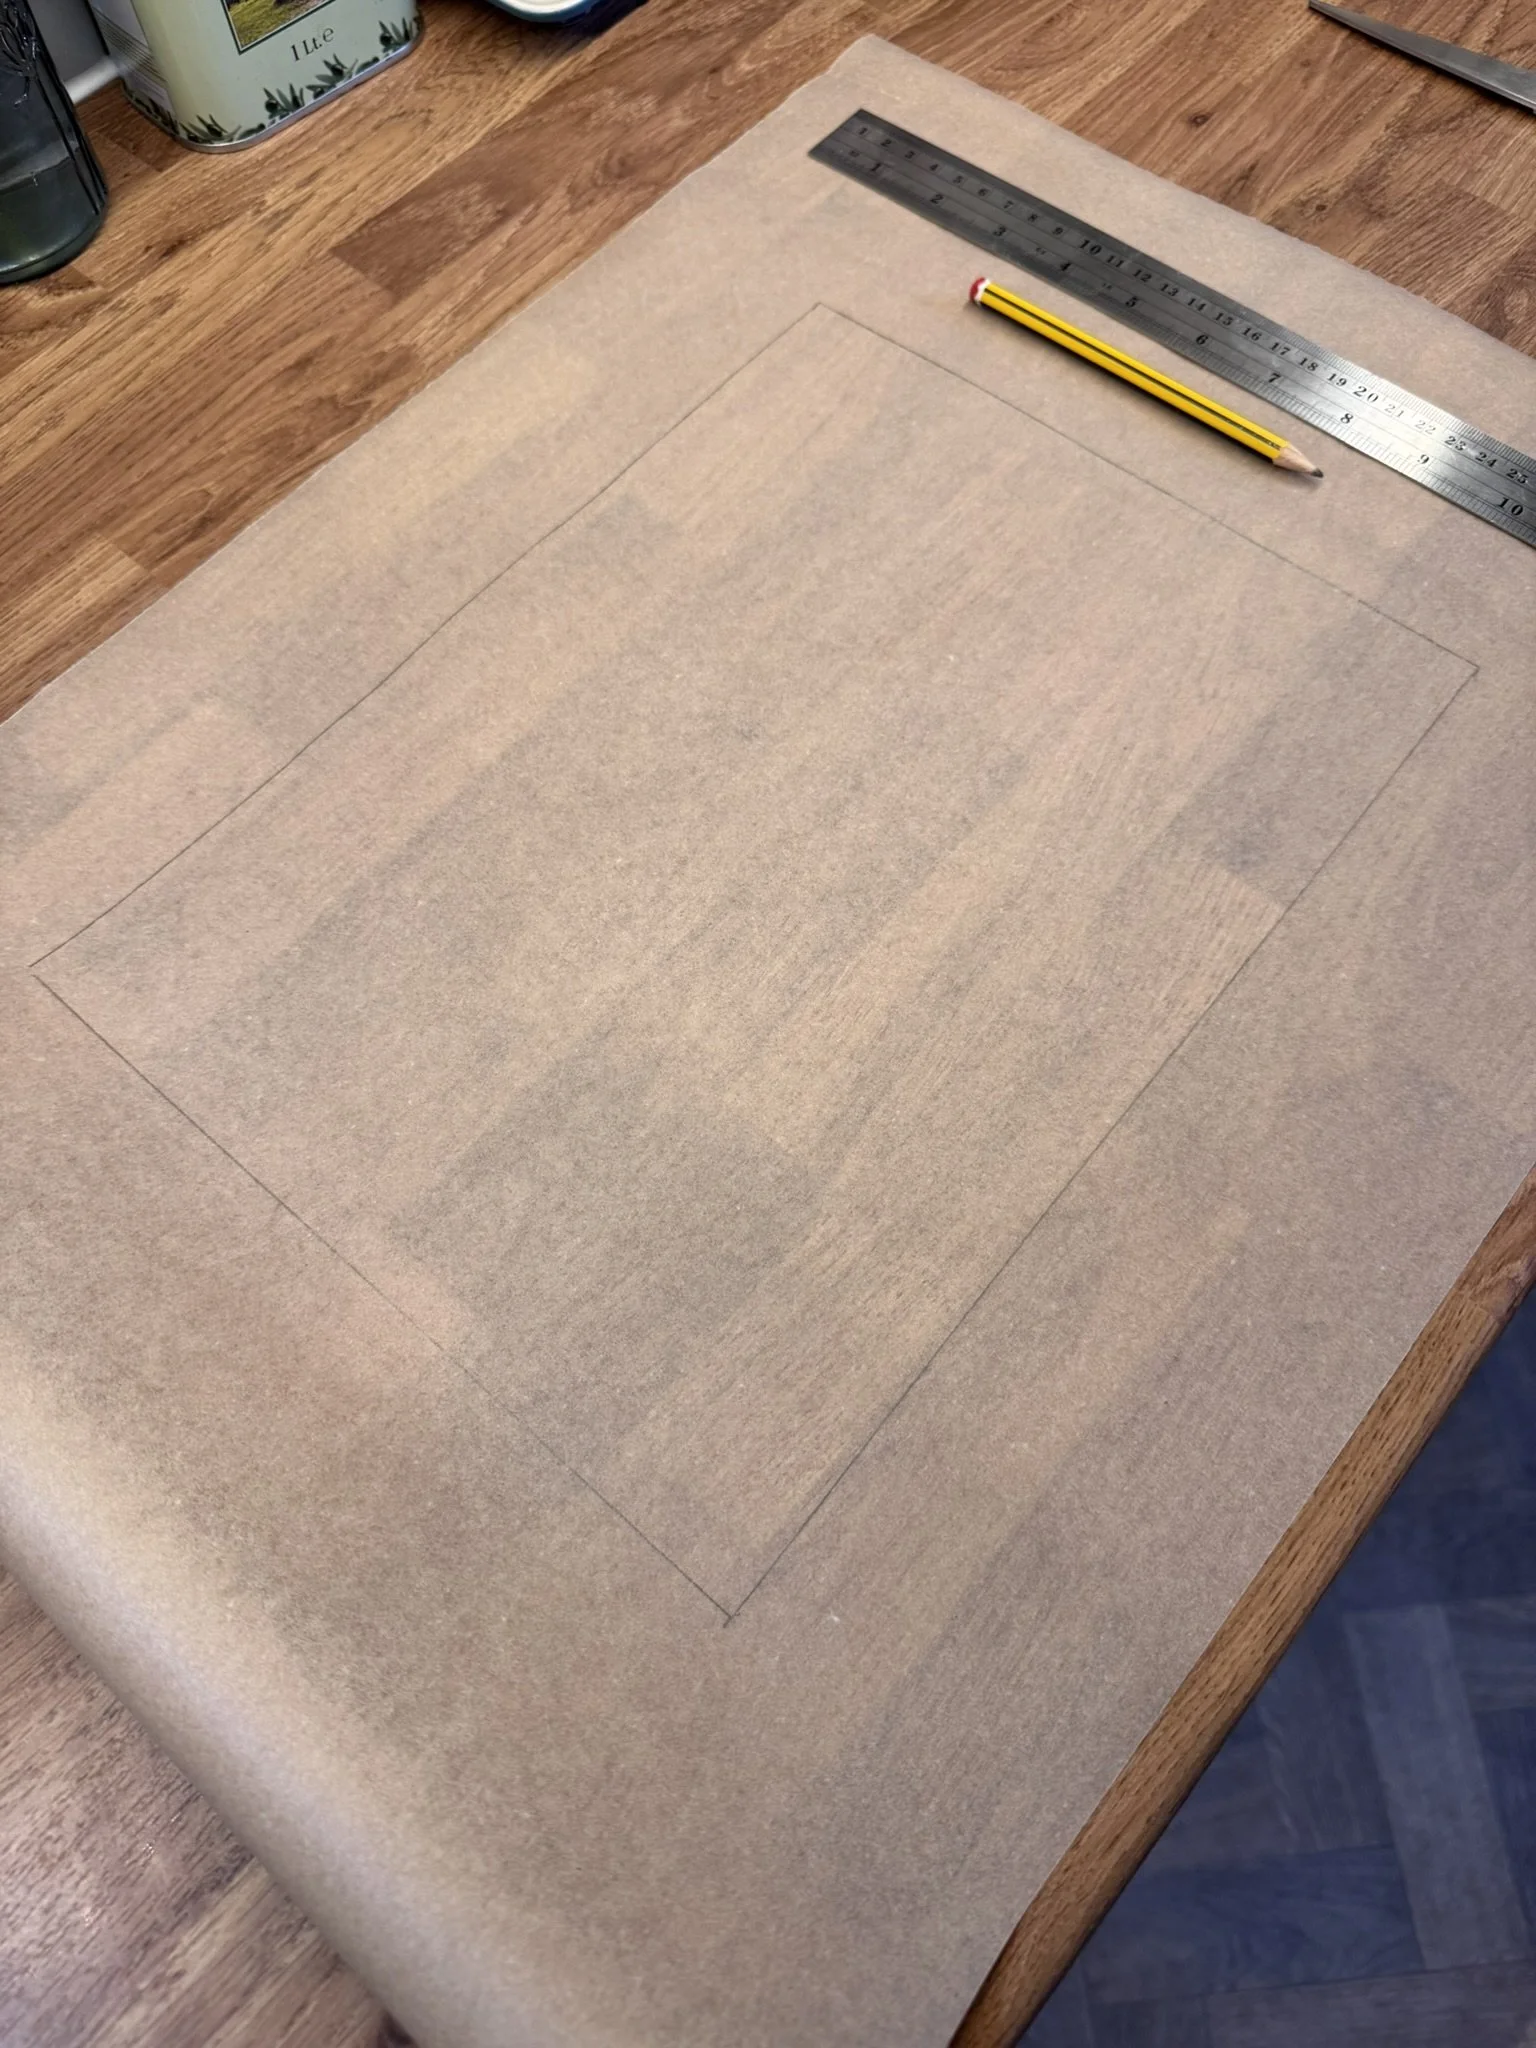
While your dough is rising, cut a ~30in length of baking paper and fold it in half with the fold on the short side. Draw out a 9x12in rectangle on the outside with the 9in side along the fold. Fold the paper along the remaining 3 lines to form a rectangular pouch. Similarly, make a 6x9in rectangular pouch.
Note: when making your baking paper pouches, make sure the pencil lines are on the outside. Otherwise the pencil can rub off on the dough and butter which is not ideal.


Once your dough has nearly doubled, unfold your 9x12in baking paper pouch. Gently take the dough out of the bowl and place in the centre of the 9x12in rectangle you drew earlier. Using your hands, gently flatten the dough out to approximately the size of the rectangle (it will be smaller, don’t worry). Then fold over the same fold lines from before and flip the pouch over. Using a rolling pin, roll the dough out in the baking paper until it is an even thickness and fills all the edges and corners. Place on a small baking tray and put in the freezer for ~20mins.


While your dough is in the freezer, prepare your butter block. Slice your unsalted butter into 10-12 even slices. Unfold your 6x9in baking paper pouch and place your slices of butter close together within the rectangle you drew earlier. It’s perfectly fine for there to be gaps of <5mm between the pieces of butter and you may need to do some trimming and rearranging to jigsaw them together. Refold the paper along the fold lines and flip it over. Using your rolling pin, bash the butter block in a few different directions along the whole surface until it starts looking more like one cohesive block. Then firmly roll parallel to the short and long sides, making sure that the butter has squidged into all the edges and corners and is an even thickness.


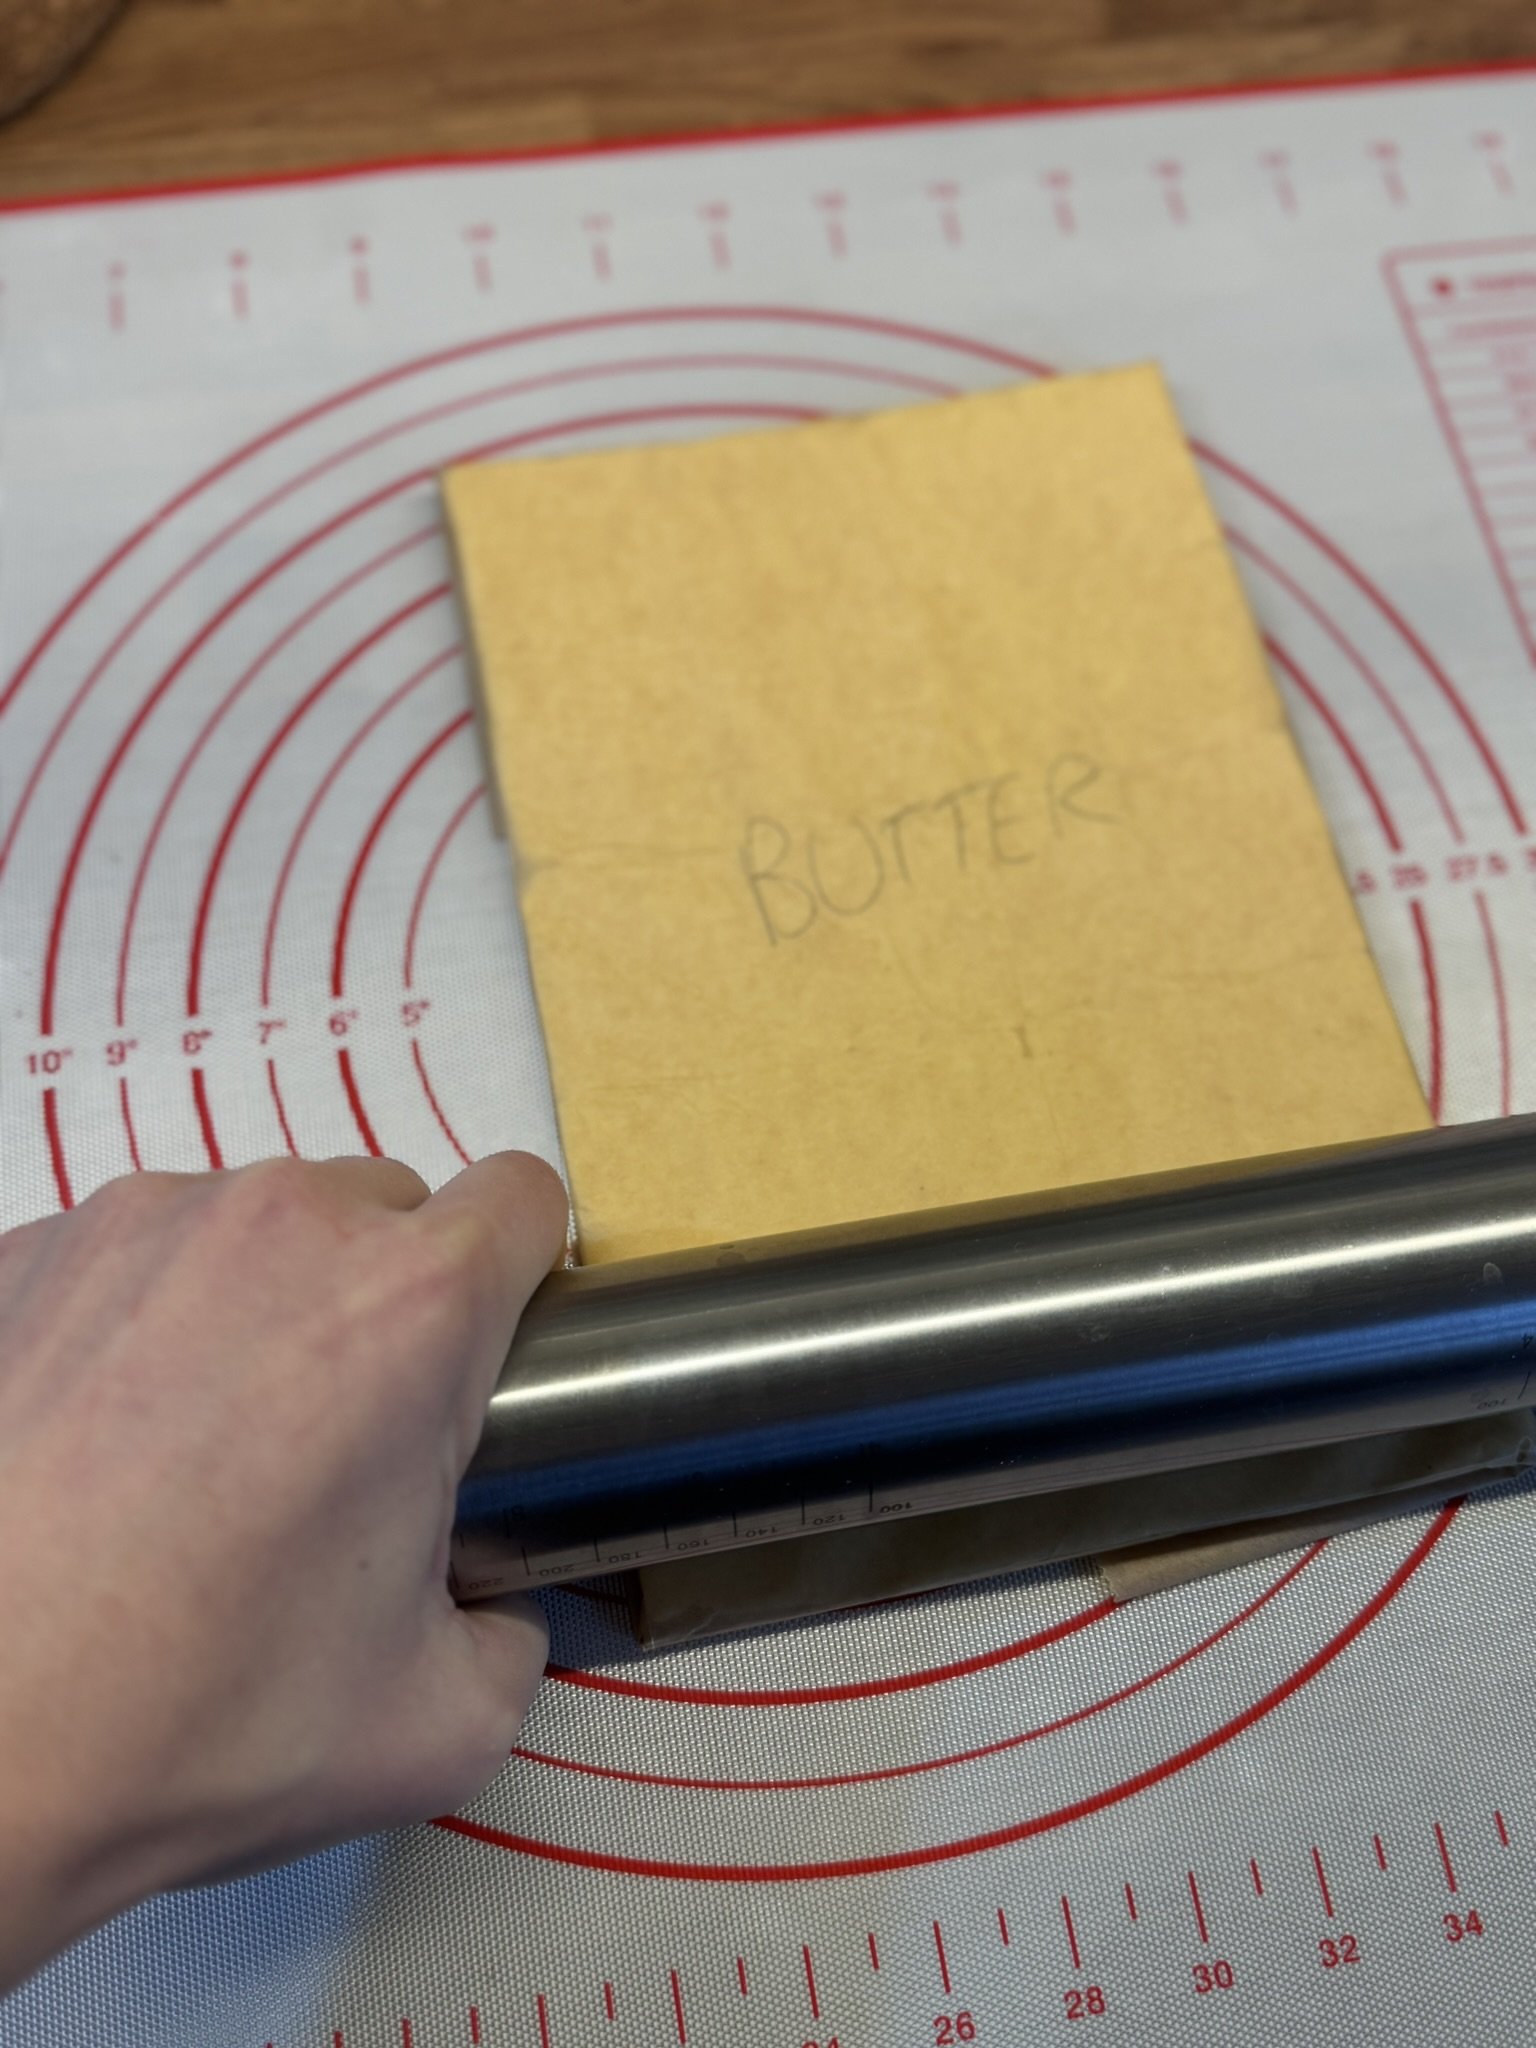

Random tip! Once the butter is a nearly perfect 6x9in rectangle of reasonably even thickness, I like to gently roll it up almost like a Swiss roll but not as tight - and I do this first along the long side, then I unroll it and do the same along the short side. The reason I do this is it allows me to check the pliability of the butter. In general I’ve found that if you can do this without the butter block cracking or oozing, it’s a good temperature and has the right pliability. If it cracks, it’s being naughty, beat and roll it more. If it oozes, it’s being saucy, put it in the fridge to cool down!


Note on butter: a lot of croissant recipes place a lot of emphasis on cool temperatures when making croissants. While it is important that things don’t get too warm, as this will make your butter melt and seep into your dough, giving your brioche rather than beautiful buttery layers, there is also the danger of having your butter too cold. If this happens, your dough will be pliable but your butter won’t be and this leads to your butter ‘breaking’ inside the dough. Once this has happened, there’s very little you can do to fix it so best to avoid it! the real goal of croissant making (in my unskilled and unqualified opinion) is to make sure that your butter and dough are the same level of pliability at all times!
Take your chilled dough out the freezer and peel off the baking paper, placing the dough onto a lightly floured clean work surface or - I prefer - a silicone baking mat, also with a light sprinkling of flour. This one is very similar to the one I have.


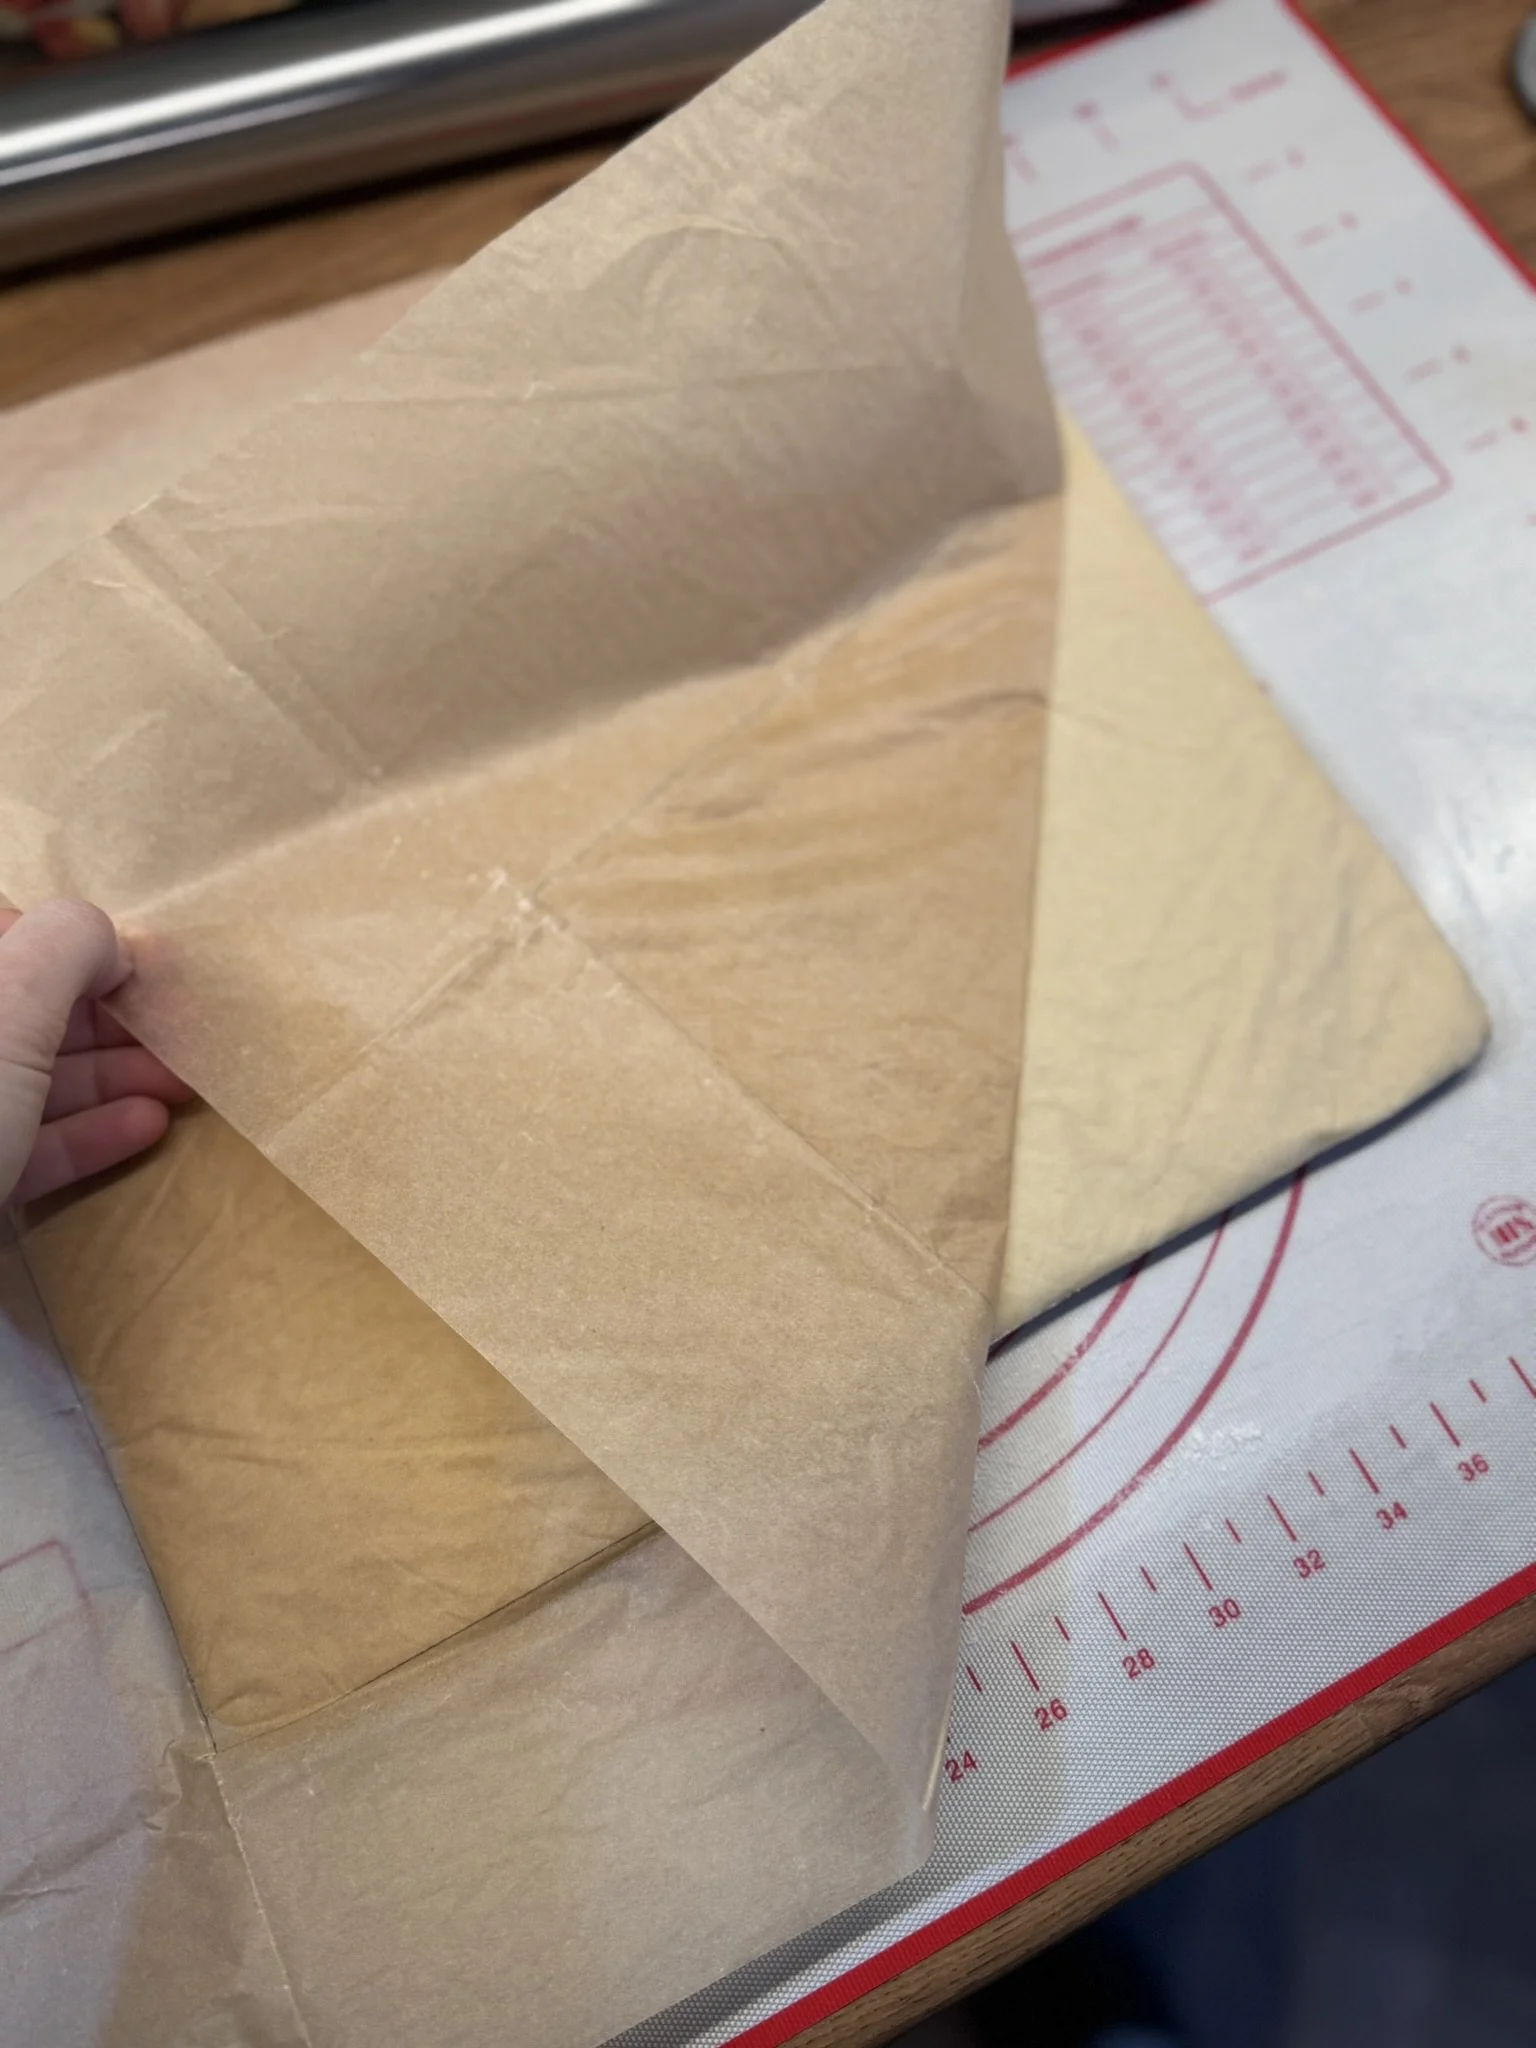
While it’s still in the baking paper, check that your butter block is ~half the size of your dough block and, if necessary, gently roll the dough to the right size. Unfold the baking paper enclosing the butter block and place it in the centre of the dough.

Place the butter in the centre of the dough

Fold both edges of the dough over to enclose the butter.
Keep the seam-side up.

Firmly press the block with a rolling pin, from the centre out along the long edge to start lenthening it.

Once the block is ~30cm long you can start to firmly roll along the length, keeping even pressure.
Using your rolling pin, firmly roll along the length of the dough. Make sure to always keep an even pressure so that the dough and butter extend together.

Roll out the dough until it is about 22in long.
Trim the short edges to make sure they’re straight. You can do this with a pizza cutter or a sharp knife.
Note on layers: There are only two folding steps in this recipe and the final dough has 25 layers. A classic French croissant has 55 layers, but you don’t need to fuss about getting this many layers at home. I find 25 is more than enough for a beautiful, buttery, flaky result! If you’re a super keen (nerdy) bean who wants to know the Maths behind the number of layers in croissants or maybe you want to play around with the number/type/order of folds, then check out this croissant layer calculator!

The first fold is a Book fold.
Fold ~1/4 of the dough over from the left side and fold the rest over from the right so the edges meet.
A pastry bastardisation tip: in my early days of making croissants, I used to really struggle with the dough slipping against itself rather than bonding together after folds, even though I religiously brushed the flour off with a pastry brush before folding the dough. The trick I now use, though I’m aware it’s somewhat sacrilegious, is to lightly brush a teeny tiny amount of water onto the surface of the dough before folding it. Not enough to make it wet (heehee) but just enough to make it tacky. I’ve found that this really helps the two layers of dough bond together when rolling it out after the fold.

Then fold the whole thing in half from right to left.
At this point I usually go straight ahead and do the next fold right away as I find that the gluten hasn’t really developed enough by this point to start fighting against you rolling it out, but you can rest it for 15-20mins before you do the next fold. I would recommend placing the dough into a ziploc plastic bag to stop it drying out. If you live in a hot climate or it’s Summer, it might be best to place it in the fridge for at least half of the resting time to ensure the butter doesn’t start to melt. In the UK winter I pretty much do everything at room temperature (~17C).
For the next fold, repeat the same steps of rolling out the dough. Start with some firm rolling pin presses along the length and the move onto a firm, even pressure continuous roll until the dough is again about 20-22in long. Trim the short edges slightly to ensure they’re straight.

The second fold is a letter fold. Fold ~1/3 of the dough in from the left.

The fold the rest of the dough in from the right, over the top of the rest.
Again, at this point you can let the dough rest for a few minutes before carrying on, but it’s not 100% necessary. Usually, impatient as I am, I just forge ahead.
The next step is to start rolling out the dough into a large rectangle so you can cut and shape the final croissants/pain au chocolat. I generally do this in two steps just to make sure the dough stays nice and relaxed, and it never gets to the point where I’m ‘fighting’ the gluten. Using a similar method of firm rolling pin presses along the dough, parallel to the long and short sides, followed by some firm, continuous rolling, start increasing the dough size.

At this point you want to try get the dough to about a 7x8in rectangle or thereabouts.

Place the dough into a ziploc bag and leave to rest for 15-20mins.
You can do this in the fridge if you’re worried about it being too warm.

Once the dough has rested, place the edge where the folds are visible towards you and roll out to a rectangle ~34cm long by 32cm wide (the edge closest to you).
Trim the edges to make sure they’re straight.
Usually when I’m making these I make a half-half batch of four croissants and four pain au chocolat because I can never decide which I actually want and also because my husband is a giant sucker for a pain au chocolat and I have to pander to his every need (love you Rhys ❤️). What you make is entirely up to you, but the photos from here will show my typical half-half batch.
Chocolate note: I get my pain au chocolat sticks from Callebaut and they are amazing, I can highly, highly recommend them! Here is a link to find them on Amazon.

Using a ruler and a pizza cutter/sharp knife, cut the dough into four (8x34cm) triangles and four (8x17cm) rectangles.
Ideally you want the width of your pain au chocolat rectangles to be the same as the length of your chocolate sticks. Too narrow and the chocolate will stick out at the ends and melt. Too wide and you won’t get the gorgeous side profile of layers and visible chocolate.
To shape the croissants: grab the base of the triangle with one hand and hold it up in the air. Using your other hand, gently stretch then triangle out slightly. You want the final length to be about 45-50cm. Be careful not to stretch too much and remember to be gentle, otherwise the dough could rip, exposing the butter.

Cut a small ~1cm slit in the middle of the triangle base.
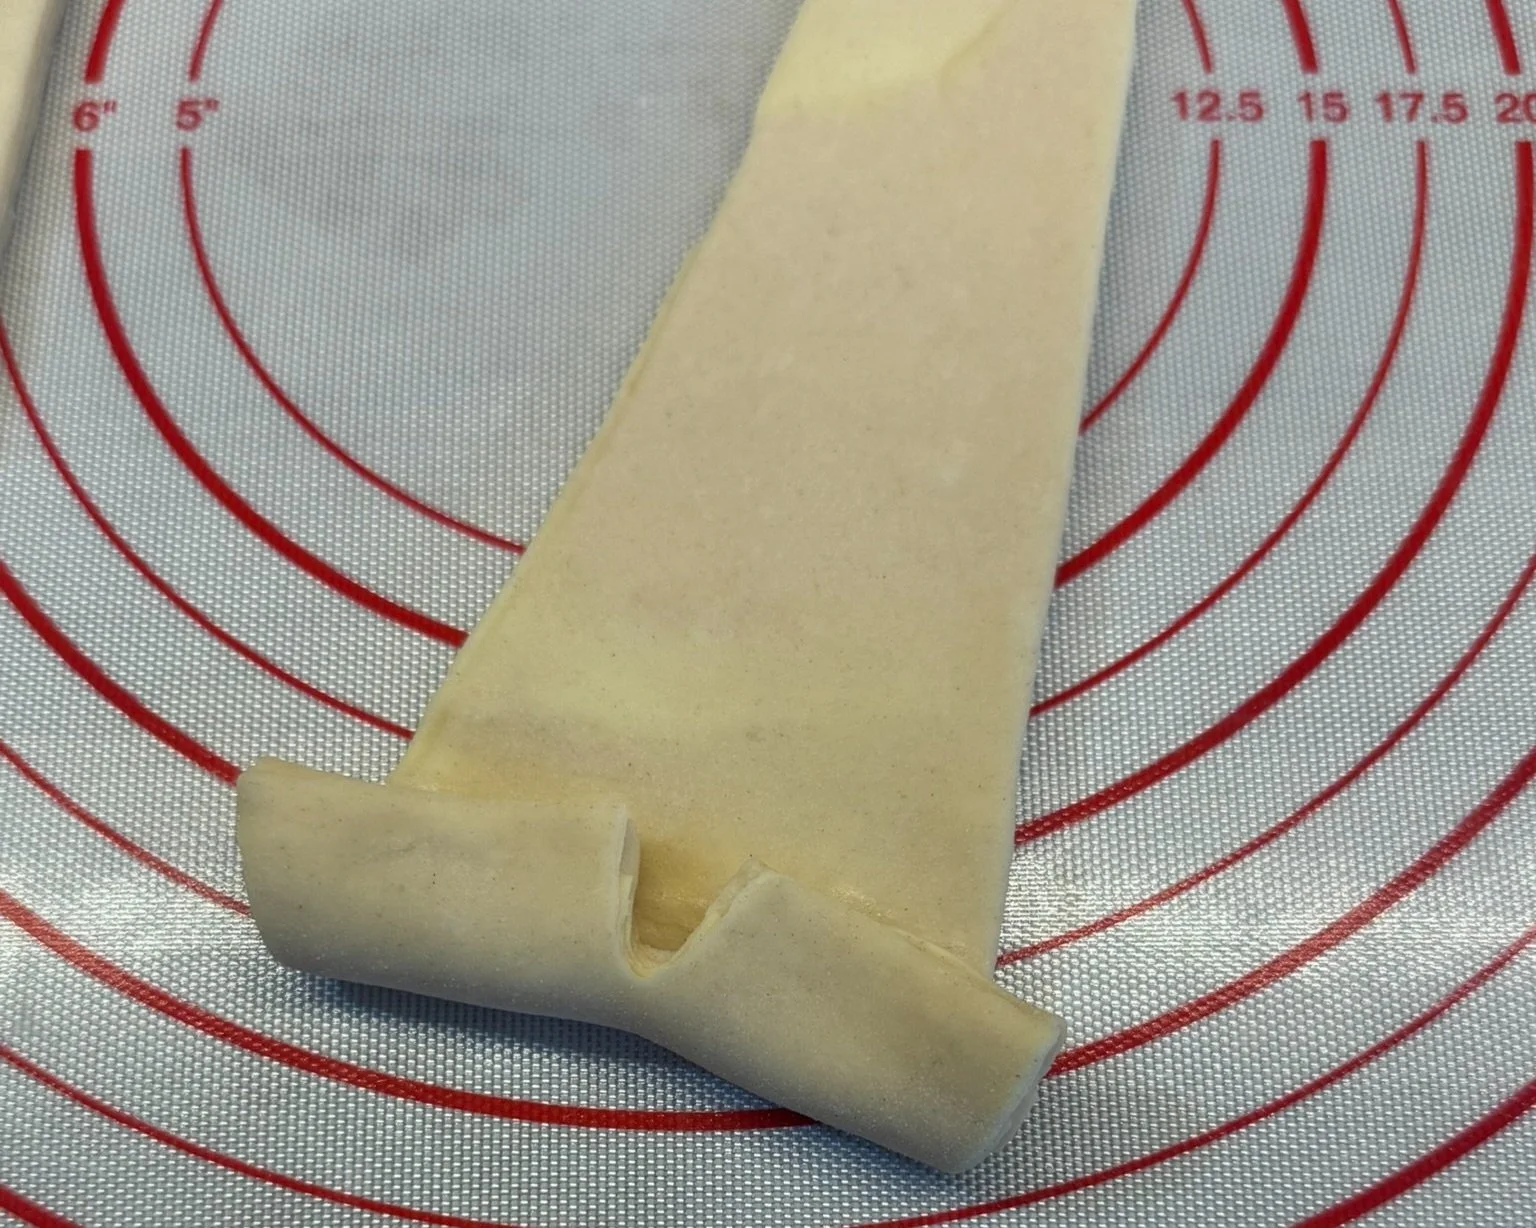
Fold the base of the triangle over, stretching the corners out so the slit forms a v-shape.
(If you’re giggling at all the possible jokes here…I was too).

Roll up the triangle, being careful not to roll too tightly or press down too firmly.

Roll up to the end and gently press down.

Tadaa! Croissant!
To shape the pain au chocolat: there is no stretching involved in shaping pain au chocolat, but I do make use of my tacky-water trick at the very end just to make sure that they seal up and are less likely to unravel while proofing.
Another note on chocolate: I like 3 sticks of chocolate in my pain au chocolat, given that these are a good size. However, comments on my Instagram posts have alerted me to the fact that some people are either angry at the world, crazy, or both, and think that 3 sticks of chocolate is “too much”. If you are one of these people, you do you boo, but know that I think you are strange.

Place the first stick of chocolate ~1cm from the edge, flat side down.

Roll the dough over the first stick of chocolate and place the second stick at a ~30degree angle with the flat side towards the curve.

Do the same again to place the third chocolate stick.

Roll over and tuck the edge under. I use a tiny bit of water right on the edge to make sure it sticks.
Tadaa! Pain au chocolat!
A note on offcuts: at a few places in this recipe, you will have trimmed edges, so you’ll have at the end, quite a few pieces of laminated dough lying around. There’s no reason to throw these away! They make great baker snacks! One of my favourite things to do is roughly squidge bits together to form some ‘ropes’ and then braid them together before rolling them up, studding with bits of chocolate and placing in a muffin tray to rise before baking as normal.
Once you have finished shaping your croissants and/or pain au chocolat, there are three ways in which you can proceed:
space them evenly on two lined baking trays, cover with a large inflated plastic bag and leave to rise before baking.
space them evenly on two lined baking trays, cover with a large inflated plastic bag and leave in the fridge overnight, then take them out the next morning to finish rising, then bake.
space them evenly on one lined baking tray, place them in the freezer until frozen solid and then transfer to a ziploc bag for freezing, and bake them another day.
Your pastries are ready to bake when they have ~doubled in size.

Methods 1 and 3 are my preferred, mostly because I never seem to have space in my fridge to house croissants!
Method 1: Same day baking
To bake your pastries on the same day, space them evenly on two lined baking trays, cover with a large inflated plastic bag and leave them to rise in a warm place until they are ~75% larger and nice and jiggly. This can take as little as 2-3hrs in Summer, but can take as long as 5-6hrs in Winter, especially if your yeast was not the freshest.
Method 2: Next day baking
Because this is a fairly lengthy process, you may want to give yourself a break and bake your pastries the next morning! However, this method reuqires a not-insignificant amount of fridge space…
Space your pastries evenly on two lined baking trays, cover with a large inflated plastic bag and place on a shelf in your fridge overnight.
The next morning, get up at whatever time you please (obviously the earlier you get up, the earlier you get to have warm pastries for breakfast, so…) and take the pastries out of the fridge, re-inflating the bag if necessary. Make a mental note of how much they’ve grown in the fridge overnight, and place the trays in a warm place to finish rising.
This could take anywhere from 2-4hrs, depending on room temperature in your house.
Method 3: Random day baking
I do this fairly often so that I can have low-effort breakfast pastries any day!
Space your pastries on one lined baking tray so they’re just not touching. Place them in the freezer until frozen solid, and then transfer to a ziploc bag. Place this bag back into your freezer.
The night before you want pastries for breakfast, take as many frozen pastries as you want out of the freezer, space them evenly on one or two lined baking trays (depending how many there are), cover with a large inflated plastic bag and leave them to rise in a warm place overnight until they are nearly doubled, and nice and jiggly. This can take as little as 7-9hrs in Summer, but can take as long as 12-14hrs in Winter, depending on how warm you keep your house.
A note on freezing: this method of pre-making and freezing pastries to bake another day is so convenient! BUT, a word of warning: yeast does not have an infinite freezer-lifespan and your pastries will get to the point where they’ve been frozen for long enough that when you take them out, they simply don’t rise… In my (very sad) experience, this tends to be after about 2.5months in the freezer. So, do as I say and not as I have done in the past, and make sure you write dates on your freezer bags!
The following steps apply to all 3 methods once the pastries are risen:
Once risen, preheat your oven to 190C (~180C fan) and whisk together one large egg yolk and 2 TBSP milk. Using a soft-bristled pastry brush, brush the pastries with the egg mixture.

I like to use a broad, soft-bristled (clean!) paintbrush.
If making the vegan version of this recipe, you can lightly brush the risen pastries with some of the leftover plant-based milk and then glaze them with maple/golden syrup once they’re baked to get that classic inviting shine!

Once risen, your croissants should have grown to nearly double and be poofy.

Same goes for pain au chocolat.
Temperature tip: I would recommend trying to get your hands on an oven thermometer so you can keep tabs on the actual temperature inside your oven. The type/age/size of your oven can all play a role in how effective the built-in temperature dial actually is. I have this one from KitchenCraft, and it’s been great!

A little troubleshooting tip:
If there’s loads of butter on the tray when they come out the oven, it either means your oven wasn’t hot enough, or your pastries were underproofed!

I like how the pain au chocolat look like little puppy/sloth faces!
A breakfast tip: you might be thinking, “Well, pastries are a breakfast food, no? Why would I ever use Method 1; bake them on the same day and then have to wait to have cold pastry for breakfast?!” Well fear not! This is my preferred method and usually ends with me baking the pastries at ~6pm. Once they’re baked, I pop them on a cooling rack under a breathable cover and leave them overnight. The next morning, I heat up my oven to 180C, pop the pastries back on the previous day’s baking tray and put them in the oven for ~4mins to warm up. When they come out the oven they are as crispy and delicious as the day they were baked!